
The NCP blog
Metallic Epoxy Floor Options for Fort Lauderdale Homeowners
Residential13 min read
The base is a 100% solids epoxy primer, which penetrates the concrete to create a mechanical bond.
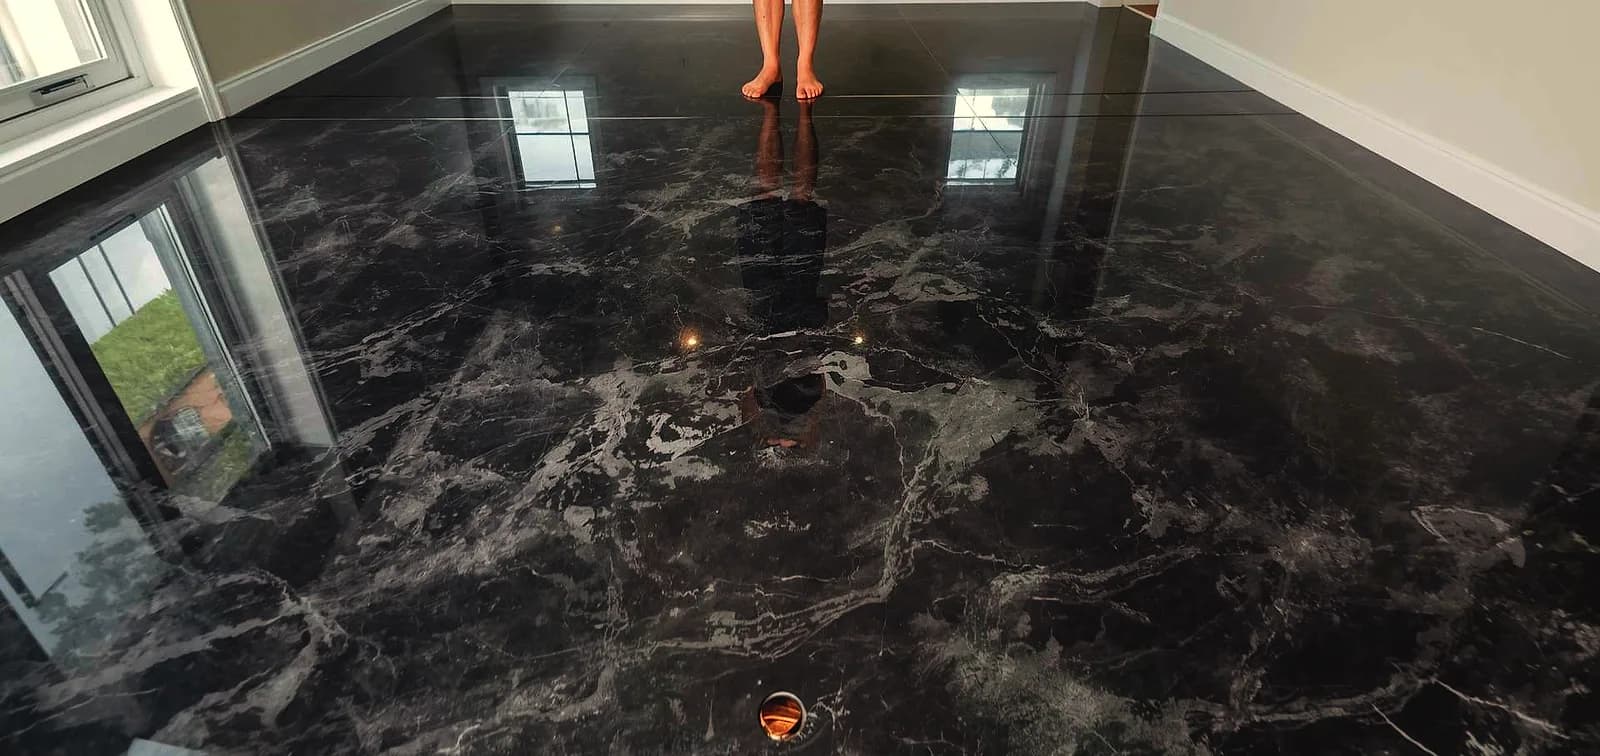
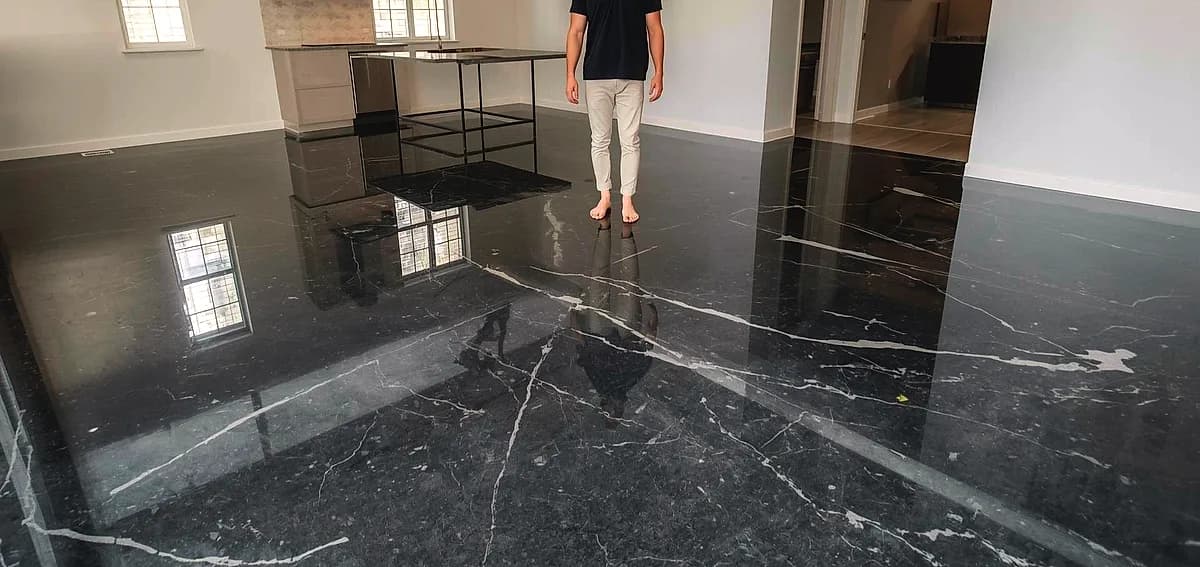
A metallic epoxy floor transforms a standard concrete slab into a seamless, high-gloss surface with swirling, three-dimensional patterns that mimic marble, lava, or storm clouds. For Fort Lauderdale homeowners, this flooring system offers a unique combination of visual drama and practical resilience against humidity, salt air, and heavy foot traffic. The installation involves a multi-layer application of a pigmented epoxy resin, manipulated with solvents and specialized tools to create one-of-a-kind visual effects that cannot be replicated by tile, vinyl, or polished concrete alone.
What Defines a High-Quality Metallic Epoxy Floor?
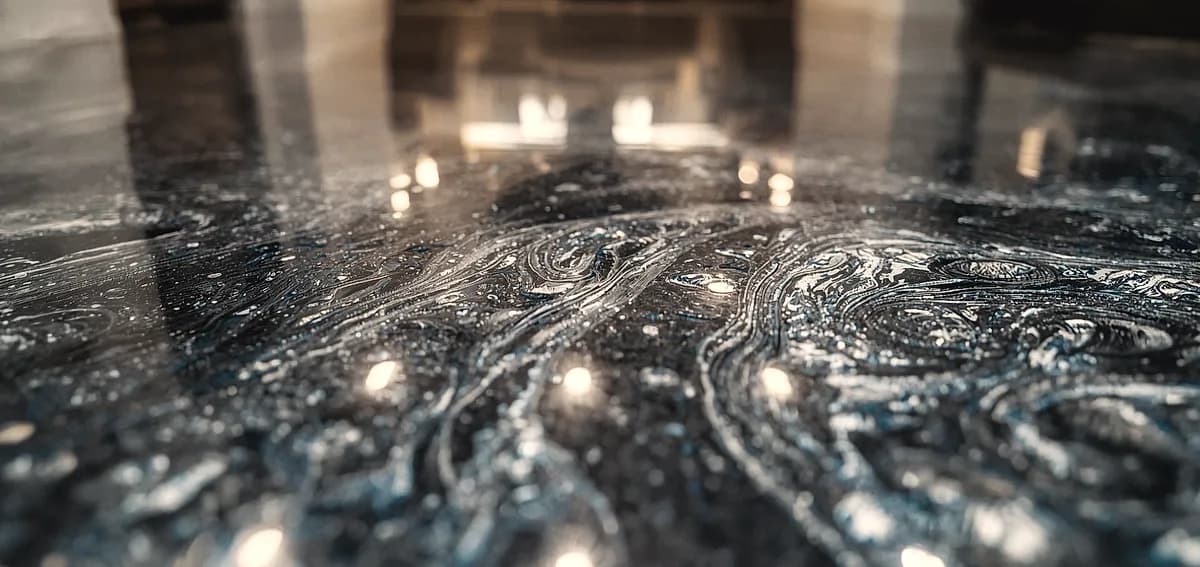
At its core, a metallic epoxy floor is a multi-layered polymer system. The base is a 100% solids epoxy primer, which penetrates the concrete to create a mechanical bond. The decorative layer consists of a clear epoxy resin mixed with metallic pigments—typically mica powders or aluminum flakes—at a ratio of about 4-6% by weight. The magic happens when a solvent, such as denatured alcohol or a proprietary reactive thinner, is sprayed onto the wet surface, disrupting the pigment alignment and creating the characteristic cells, ribbons, and waves. According to the American Concrete Institute, the tensile strength of a properly cured epoxy topping can exceed 10,000 psi, making it far more durable than the concrete substrate it covers.
Fort Lauderdale’s subtropical climate introduces790 specific challenges. The high water table and frequent rain mean that concrete slabs often have elevated moisture vapor emission rates (MVER). Industry standards from the International Concrete Repair Institute (ICRI) mandate that MVER should not exceed 3 pounds per 1,000 square feet per 24 hours before a non-breathable coating is applied. Ignoring this leads to hydrostatic pressure building up beneath the epoxy, causing bubbles, blisters, and eventual peeling. A calcium chloride test is the minimum requirement; a relative humidity (RH) probe test at 40% of slab depth provides more accurate data for our region.
Design Options: From Subtle Shifts to Bold Statements
The design vocabulary of metallic epoxy is vast. Homeowners are not limited to a single color; the technique allows for layering multiple hues to create depth. A popular 2026 trend in Fort Lauderdale’s waterfront estates is the “deep ocean” effect, achieved by combining cobalt blue, teal, and pearl white pigments over a black primer base. The result evokes the movement of Atlantic currents right in a living room or home office. Another sought-after16 style is the “burnished copper” look, which uses copper, bronze, and gold pigments to create a warm, industrial-chic aesthetic that pairs exceptionally well with exposed brick and reclaimed wood elements.
The application method dictates the final visual. A squeegee-and-roller technique produces a more uniform, subtle shimmer. In contrast, a full broadcast method, where the installer manipulates the wet epoxy with trowels, spiked shoes, and leaf blowers, creates dramatic, sharp-edged patterns. As Maria Hernandez, Lead Designer at South Florida Epoxy Artisans, explains: “We treat each floor like a canvas. The client’s personality dictates the movement. A minimalist might want a gentle, single-color marbling, while an art collector might request a floor that mimics a Jackson Pollock painting with splashes of silver and charcoal.”
Color Palettes That Complement South Florida Architecture
Mediterranean-style homes with terracotta roofs and stucco walls benefit from warm-toned metallic floors in amber, rust, and chocolate. Mid-century modern homes in neighborhoods like Victoria Park shine with cool grays, whites, and subtle blue undertones. The key is to select a palette that bridges the interior design with the natural light. Fort Lauderdale’s intense sunlight can wash out lighter colors, so a slightly more saturated pigment load is often advisable. A comparison of popular palettes helps clarify the choice:
| Design Style | Primary Pigments | Best Room Application | Lighting Recommendation |
|---|---|---|---|
| Coastal Calm | Pearl, Aqua, Sand | Master Bathroom, Sunroom | Natural daylight, 4000K LED |
| Industrial Luxe | Graphite, Copper, Bronze | Home Office, Loft | Warm 2700K, Edison bulbs |
| Modern Organic | Ivory, Sage, Gold | Open-Plan Living Area | Dimmable 3500K, large windows |
| Dramatic Noir | Onyx, Silver, Cobalt | Media Room, Bar | Accent lighting, 3000K spotlights |
Cost Analysis for Fort Lauderdale Homeowners in 2026
The investment for a metallic epoxy floor in Fort Lauderdale ranges from $7 to $15 per square foot for a standard residential installation. This price typically includes concrete grinding, crack repair, a moisture-mitigating primer, the metallic epoxy layer, and a UV-stable polyaspartic topcoat. A 500-square-foot garage might cost between $3,500 and $7,500, while a 1,500-square-foot open-plan living area could range from $10,500 to $22,500. These figures are 15-20% higher than the national average, reflecting South Florida’s labor rates and the mandatory moisture mitigation steps. According to HomeGuide’s 2026 cost data, the national median for epoxy flooring is $6.50 per square foot, but that rarely accounts for760 the high-solids primers and topcoats required in humid zones.
Several variables influence the final quote. Concrete condition is paramount; extensive crack repair or leveling with a self-leveling underlayment adds $2-$4 per square foot. Design complexity also matters—a single-color metallic floor is800 on the lower end, while a multi-color, hand-manipulated design with a high-gloss finish can push the price to $18 per square foot. The choice of topcoat is another cost driver. Polyaspartic topcoats cure faster and offer superior UV resistance compared to traditional urethanes, but they add about $1.50 per square foot. For a detailed breakdown of the preparation steps, review our epoxy floor prep checklist.
acción The Critical Role of Moisture Mitigation
In Fort Lauderdale, moisture mitigation is not an optional upgrade; it is the foundation of a successful installation. The city’s average annual relative humidity hovers around 74%, and the water table is often just a few feet below the slab. When a non-breathable coating like metallic epoxy is applied over a slab with high moisture content, the water vapor attempts to escape, creating a phenomenon called osmotic blistering. This appears as small, pimple-like bumps that eventually rupture, leaving craters in the floor. Research from the Portland Cement Association indicates that over 80% of coating failures in coastal regions are attributable to inadequate moisture testing and mitigation.
The most reliable mitigation strategy involves applying a two-component, moisture-tolerant epoxy primer designed to suppress MVER up to 25 pounds. These primers penetrate the concrete’s capillary pores and form a barrier that prevents liquid water and vapor from reaching the decorative layer. For slabs with extreme moisture, a topical moisture mitigation system using a trowel-applied, cementitious slurry may be necessary before the primer. As David Chen, Senior Chemist at Ardex Americas, states: “In a market like Fort Lauderdale, you must assume the slab is wet until proven otherwise. A calcium chloride test is a snapshot; an in-situ RH test is the movie. We recommend contractors use ASTM F2170 probes as their standard protocol.” For more on this topic, see our guide on why waterproofing matters under epoxy in South Florida.
Installation Process: A Step-by-Step Breakdown
A professional metallic epoxy installation spans 3 to 5 days, depending on the square footage and design complexity. The process is meticulous, and each step directly impacts the floor’s longevity and visual impact. Here is the standard sequence followed by top Fort Lauderdale contractors:
- Surface Preparation (Day 1): The concrete is diamond-ground using a planetary grinder with 30- to 80-grit tooling to remove laitance, contaminants, and existing coatings. This opens the concrete’s pores for optimal adhesion. All cracks and control joints are chased and filled with a semi-rigid epoxy filler. The surface is then vacuumed to remove all dust.
- Moisture Testing and Priming (Day 1-2): If RH probes were not placed earlier, a calcium chloride test is conducted. Once the slab passes, a moisture-mitigating epoxy primer is applied with a roller at a spread rate of 200-300 square feet per gallon. This coat cures for 8-12 hours.
- Metallic Epoxy Application (Day 2-3): The pigmented epoxy is mixed in batches to ensure color consistency. It is poured onto the floor in ribbons and spread with a squeegee or notched trowel to a thickness of 10-15 mils. The installer then uses a solvent sprayer, leaf blower, or trowel to manipulate the pigments into the desired pattern. This stage requires artistic skill andaleb speed, as the epoxy has a pot life of 30-45 minutes.
- Topcoat Application (Day 4): After the metallic layer cures for 12-24 hours, a UV-stable polyaspartic topcoat is applied. This coat is typically 4-6 mils thick and provides gloss, chemical resistance, and protection against yellowing from sunlight. A second topcoat may be applied for high-traffic areas.
- Curing and Final Inspection (Day 5): The floor is ready for light foot traffic in 24 hours and full cure in 72 hours. The contractor performs a final inspection, checking for adhesion, gloss level, and any imperfections. For a deeper dive into the application nuances, visit our page on metallic epoxy application.
acción Common Pitfalls and How to Avoid Them
One of the most frequent mistakes is applying metallic epoxy over a poorly prepared substrate. Homeowners who opt for cut-rate installers often find that the floor begins to peel within six months. This is almost always due to insufficient diamond grinding or skipping the primer. The epoxy needs a surface profile equivalent to CSP 3-4 (Concrete Surface Profile) as defined by the ICRI; a simple acid etch cannot achieve this reliably. Another common issue is “amine blush,” a waxy film that forms on the epoxy surface when it cures in high humidity. This blush must be removed with a solvent wipe before the topcoat is applied, or intercoat adhesion will fail.
Design-related pitfalls include overworking the metallic pigments. Excessive manipulation with a trowel can cause the pigments to blend into a muddy, uniform color, losing the desired three-dimensional effect. The solvent must be applied at the precise moment when the epoxy is still fluid but beginning to gel. Timing is everything. For homeowners considering a DIY approach, the risks are substantial. A $500 DIY kit might seem appealing, but the cost of professional removal and reinstallation after a failure averages $12 per square foot. As Carlos Mendez, Owner of Fort Lauderdale Epoxy Pros, warns: “I’ve had to tear out dozens of DIY metallic floors. The most common error is applying it too thin—less than 10 mils—which leaves no room for the pigments to move and creates a flat, lifeless look. You only get one chance to get the swirls right.”
Maintenance and Longevity in a Coastal Environment
A professionally installed metallic epoxy floor with a polyaspartic topcoat has a service life of 15-20 years in a residential setting. To achieve this lifespan,800 a consistent maintenance routine is essential. Sand, salt, and grit tracked in from Fort Lauderdale’s beaches act as abrasives that can dull the gloss over time. Daily dry dust mopping with a microfiber pad removes these particles. Weekly cleaning should use a pH-neutral cleaner specifically formulated for epoxy floors; avoid acidic cleaners like vinegar or citrus-based products, which etch the topcoat. For detailed40 maintenance protocols, see our guide on metallic epoxy maintenance.
UV exposure is the primary long-term threat. Even with a UV-stable topcoat, prolonged direct sunlight through large sliding glass doors can cause a slight amber shift over a decade. Using window films or UV-blocking blinds in sun-drenched rooms mitigates this. For exterior applications like pool decks or patios, a metallic epoxy is generally not recommended; the UV degradation is too rapid, and the surface becomes dangerously slippery when wet. A better alternative for outdoor spaces is a textured, broadcast epoxy system or polished concrete. If a spill occurs, blot it immediately; metallic epoxy is stain-resistant but not stain-proof, and dark pigments like red wine or coffee can leave marks if left overnight.
Comparing Metallic Epoxy to Other Premium Flooring Options
When evaluating a metallic epoxy floor against other high-end flooring choices, the decision often comes down to aesthetics, cost, and performance. Porcelain tiles offer a classic look and excellent durability, but they introduce grout lines that trap dirt and can crack if the slab shifts. According to a 2026 report from the National Association of Home Builders, the average cost for high-end porcelain tile installation in South Florida is $12-$20 per square foot, making it comparable to or slightly more expensive than metallic epoxy. However, tile lacks the seamless, monolithic appearance that is a hallmark of epoxy.
Polished concrete is another competitor, particularly for homeowners seeking an industrial-minimalist aesthetic. It is highly durable and less expensive, typically ranging from $4-$8 per square foot. However, it cannot replicate the fluid, marbled patterns of metallic epoxy. The choice often hinges on the desired visual impact. For a detailed comparison, read our analysis of polished concrete vs. tiles. Vinyl plank flooring is a budget-friendly option at $3-$7 per square foot, but it cannot match the lifespan or the luxurious, high-gloss finish of a properly installed metallic epoxy system. For more on this, see epoxy flooring vs. vinyl.
Environmental and Health Considerations
Modern metallic epoxy systems have evolved significantly in terms of environmental impact. The shift toward 100% solids formulations means that virtually no volatile organic compounds (VOCs) are released during curing. This is a critical consideration for occupied homes, particularly those with children or individuals with respiratory sensitivities. The U.S. Green Building Council recognizes low-VOC epoxy systems as compliant with LEED v4.1 standards for low-emitting materials. However, the installation process itself requires temporary ventilation; the solvent used to create the metallic effect—often denatured alcohol—does emit fumes until it fully evaporates. Professional installers use air scrubbers and containment barriers to minimize24 any impact on the living space. For a broader perspective, review our article on epoxy flooring environmental impact.
Another sustainability angle is the preservation of the existing concrete slab. By coating rather than replacing the concrete, homeowners avoid the carbon-intensive process of demolishing and pouring new cement. The longevity of a metallic epoxy floor—often outlasting several cycles of carpet or vinyl replacement—further reduces its lifecycle environmental footprint. When the floor eventually reaches the end of its life, it can be recoated rather than removed, adding another layer of sustainability.
Frequently Asked Questions
Can a metallic epoxy floor be installed over existing tile?
Yes, but it requires extensive preparation. The tile must be mechanically abraded to create a profile, and all grout lines must be filled with an epoxy filler to prevent ghosting. A high-build primer is then applied to create a uniform substrate. This process is complex and should only be undertaken by experienced professionals. For more details, see our guide on epoxy over tile.
How slippery is a metallic epoxy floor when wet?
The high-gloss finish is inherently smooth, but a polyaspartic topcoat can be formulated with aluminum oxide or polymer grit additives to achieve a coefficient of friction (COF) above 0.6, which meets ADA and OSHA standards for slip resistance. For areas prone to water, like bathrooms or pool entries, a textured topcoat is essential.
Will the floor yellow over time in a sunny Fort Lauderdale room?
If a high-quality, UV-stable polyaspartic topcoat is used, yellowing is minimal and occurs over 10-15 years. Epoxy alone, without a UV topcoat, will amber significantly within 6-12 months of direct sun exposure. The topcoat acts as a sacrificial layer that absorbs UV radiation.
Can I install a metallic epoxy floor in my garage?
Absolutely. Metallic epoxy is a popular choice for high-end garages. The key is to ensure the topcoat is rated for hot tire pickup and chemical resistance against gasoline and oil. A double coat of polyaspartic is standard for garage applications. See our garage epoxy flooring Fort Lauderdale page for specifics.
How do I repair a scratch or chip in a metallic epoxy floor?
Minor scratches can be buffed out with a polishing compound. For deeper chips, a professional repair involves filling the area with a clear epoxy, tinting it to match, and then reapplying a topcoat over the repaired section. Matching the exact metallic pattern is challenging, so prevention with felt pads on furniture is crucial. Learn more about the epoxy floor repair process.
What is the difference between metallic epoxy and a flake epoxy floor?
Metallic epoxy uses pigments and solvents to create a fluid, marbled pattern with a high-gloss finish. Flake epoxy involves broadcasting colored vinyl chips into a base coat and sealing them with a clear topcoat. Flake floors offer more texture and slip resistance, while metallic floors provide a seamless, glass-like aesthetic. The choice depends on the desired look and function.
Conclusion
A metallic epoxy floor represents a fusion of art and engineering, offering Fort Lauderdale homeowners a durable, moisture-resistant, and visually captivating flooring solution. The key to a successful installation lies in meticulous preparation, professional application, and a clear understanding of the local climate’s demands. From the initial moisture testing to the final polyaspartic topcoat, every step must be executed with precision to ensure the floor’s longevity and beauty. The result is a one-of-a-kind16 surface that elevates the entire home, reflecting light and personal style in equal measure. If you are considering this transformative upgrade for your property, contact us today to schedule a consultation and explore the design possibilities for your space.
References
- American Concrete Institute. Epoxy Coating Standards and Tensile Strength Data
- International Concrete Repair Institute (ICRI). Guideline for Moisture Testing and Surface Preparation
- HomeGuide. 2026 Epoxy Flooring Cost Data
- Portland Cement Association. Research on Coating Failures in Coastal Regions
- U.S. Green Building Council. LEED v4.1 Low-Emitting Materials Credit
- National Association of Home Builders. 2026 Cost of Construction Report
Written by

Founder and CEO
Chris Lavin is an esteemed leader in concrete polishing and epoxy coatings with a distinguished 20-year career. As founder and CEO of National Concrete Polishing and owner of Xtreme Polishing Systems, he's renowned for polishing and epoxy coating more floors than anyone globally. Chris is recognized for his innovative approach and commitment to enhancing floor durability and aesthetics. His hands-on experience and technical proficiency make him a respected authority and a valuable resource in the field of floor polishing and coatings.
Same topic
Related articles
All stories
Residential8 min read
What Restaurants Need to Pass a Health Inspection Floor Check
It endures heavy foot traffic, dropped equipment, boiling water spills, and harsh degreasing chemicals daily.
Read it
Residential9 min read
How Restaurants Replace Their Floors Without Closing for Long
The average food service establishment loses approximately $3,500 in daily revenue during unexpected closures in 2026.
Read it
Residential8 min read
Where Polished Concrete Beats Epoxy in a Home (and Where It Doesn’t)
Before evaluating specific rooms, it is essential to understand how these two flooring systems function.
Read it
Tell us about the floor
Tell us the space and roughly how big it is.We come back with what it would cost and when we could start.
Prefer to talk? Call +1 844-876-5474
- Leads@
nationalconcretepolishing.net - 2200 NW 32nd St #600,
Pompano Beach, FL 33069 Mon to Fri, 9:00 to 5:30